Showing posts with label bread. Show all posts

Friday, 1 February 2013

Bacon, egg and toast cups


Bacon, egg and toast cups
Recipe adapted from Martha Stewart
Preparation time: 15 minutes
Cooking time: 15-20 minutes (depending on how you like the doneness of your egg yolk)
Serves 6

Ingredients
3 tbsp butter, melted
7 1/2 slices white bread
6 slices bacon
3 tbsp Parmesan cheese
6 eggs
Salt and freshly ground pepper


1. Preheat oven to 190°C (375°F) - if you are using a convection oven, please turn off the fan setting or your eggs will be overcooked. Otherwise, you may need to reduce the temp by about 15C.

2. In a large frying pan, cook the bacon until almost crisp (85% cooked) over medium heat, flipping once. It will continue to cook in the oven. Remove from heat and leave aside.


3. Lightly butter a 6-standard muffin cup. Alternatively, you can use a 12 cup pan, leaving empty space in between.

4. With a rolling pin, flatten bread slices slightly. Cut off the crust off all the bread, then cut 6 pieces into halves. Cut the other bread into quarters (ie you need 6 quarters for the base).

5. Place 2 halves of bread into each muffin cup, overlapping slightly around the exterior to form a circle - make sure the bread comes up to edge of cup. Use the quarter piece for the base and to patch any gaps. Repeat for other 5 cups, then brush all bread cups with remaining butter.


6. Place a piece of bacon in each bread cup and then sprinkle with some Parmesan cheese (about 1/2 tsp per cup or more if you like). Crack an egg in a bowl and pour into the bread cup slowly, avoiding overspill of egg white. Season with salt and pepper.

7. Bake until egg whites just set, suggested cooking time in Martha Stewart's recipe is around 20-25 minutes however I find that this resulted in a cooked (solid) egg yolk. I prefer my egg yolk runny so I took mine out around 16 minutes, you may need to try this a couple of times til you get the exact timing for your preferred doneness.

8. Run a small knife around cups to loosen toasts. Serve immediately with some fresh cherry tomatoes, which go nicely with the bacon, egg and toast cups.


9. Alternatively, you can also make a "baked egg version" by beating your eggs with some salt, pepper and 1 tbsp milk and then pouring over the bacon and Parmesan. For this, bake for 18-20 minutes. Instead of bacon, you can also substitute with ham if you like.


Healthy Sweet Potato and Raisin Loaf *


Purple Japanese sweet potato


On the day it was baked, this loaf has a nice crusty exterior and a moist centre. We did find that the loaf wasn't as nice the next day as it tends to dry out a little. The best way to enjoy it is with some butter and a cuppa coffee/tea.


Sweet Potato and Raisin Loaf
Preparation time: 15 minutes
Cooking time: 1 - 1 1/4 hour
Makes 1 loaf

Ingredients
250g plain flour
2 tsp baking powder
1/2 tsp salt
1 tsp ground cinnamon
1/2 tsp grated nutmeg

450g mashed cooked sweet potatoes
30g soft brown sugar
115g butter, melted and cooled
3 eggs, beaten
75g raisins

1. Preheat oven to 180°C. Grease a 9 x 5 inch (23 x 13 cm) loaf tin.

2. Sift the flour, baking powder, salt, cinnamon and nutmeg into a mixing bowl. Set aside.

3. With an electric mixer, beat the mashed sweet potatoes with the brown sugar, butter and eggs until well mixed.


4. Add the flour mixture and raisins to the wet mixture. Stir with a wooden spoon until the flour is just mixed in. It may look a little lumpy at this point, but don't worry.

5. Transfer the batter to the prepared tin. Bake for 1 - 1 1/4 hours, or until a skewer inserted in the centre comes out clean.


6. Cool in the pan on a wire rack for 15 minutes, then turn the bread on to the wire rack to cool completely. I served them warm, after about 20-25 minutes after it came out of the oven with some butter.


Thursday, 31 January 2013

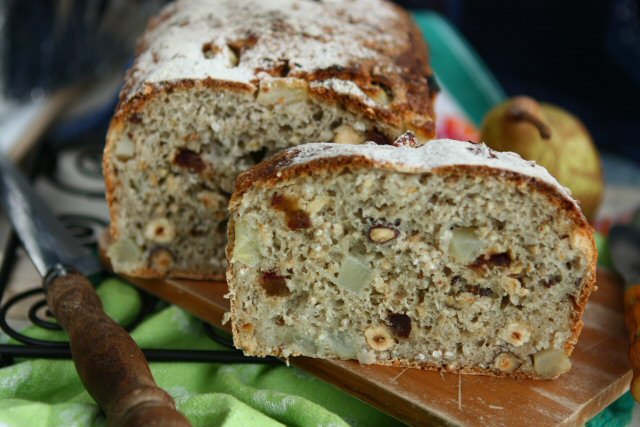
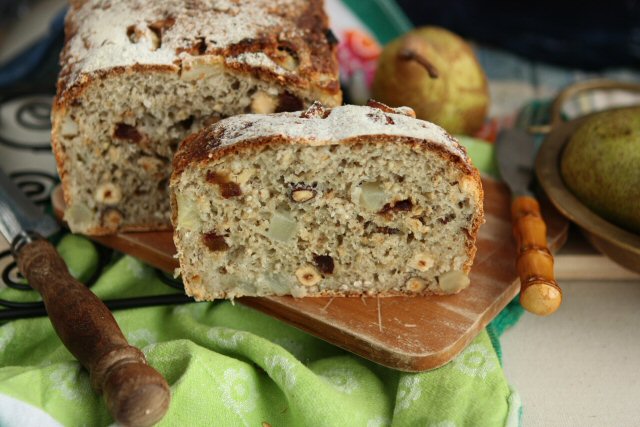
Buckwheat Bread with Pear and Hazelnut


http://schneiderchen.de | © 2013 | http://angiesrecipes.blogspot.com


http://schneiderchen.de | © 2013 | http://angiesrecipes.blogspot.com


Ingredients
  • 100 g Buckwheat groats
  • 100 ml Water, boiling
  • 200 g Pear, peeled, cored and diced
  • 50 g Candied ginger, diced
  • 50 g Soft dried dates, diced
  • 20 g Fresh yeast
  • 300 ml Lukewarm water
  • 50 g Maple syrup
  • 100 g Buckwheat flour
  • 350 g Bread flour
  • 100 g Hazelnuts
  • 10 g Salt

Method
  1. Soak buckwheat groats in the boiling water for 2 hours until all the water has been absorbed. Peel, core and dice the pear. Dice the candied ginger and dried dates. Dissolve the yeast in lukewarm water in the mixing bowl of your stand mixer.
  2. Add in maple syrup, soaked buckwheat groats, flours, hazelnuts, and salt. Mix first at slow speed for 4 minutes, then increase the speed and mix for a further 4 minutes. Fold in diced pear, candied ginger, and soft dates. The dough is rather sticky.
  3. Turn it onto a floured work surface and dust the dough with a little flour. Cover with a kitchen towel and rest for 30 minutes at the room temperature. Fold and shape the dough into a round every 10 minutes.
  4. Grease a loaf pan or line with parchment paper. Place the dough into the pan and rest for another 30 minutes. Meanwhile preheat the oven to 210C/410F with a roasting tray filled with water at the bottom of the oven. Bake the bread in the middle rack of hot oven for 45-50 minutes.

http://schneiderchen.de | © 2013 | http://angiesrecipes.blogspot.com


Sunday, 27 January 2013

Green Tea Loaf


Ingredients: ( from Min's Blog )
high protein flour 300gm
caster sugar 30gm
salt 1/4 tsp
instant yeast 1 1/4 tsp
water 180ml
butter 20gm
green tea powder 1/2 tsp ( i used abt 1 tsp for stronger taste and colour )

Method:
1. Combine flour, sugar , salt , yeast and water in a mixer and mix well till smooth dough is formed.
2. Add in butter till dough is smooth and shiny.
3. Divide dough into 2 portions and add in the green tea powder into one portion and mix till dough is even colour.
4. Clingwrap both dough and let it proof about an hour or almost double in size.
5. Shape both dough into round shapes and let them rest for 10 minutes.
6. Divide each dough into 2 portions, so now altogether 2 portions of plain dough and 2 portions of green tea dough.
7. Roll them out and shape them into rectangle
8. Stack the layers alternately, flatten the dough and roll them up tight.
9. Place in a lightly greased loaf tin ( 11cmx11cmx23cm) and let proof for second time for an hour .
10. Bake in a preheated oven 180C for 30 mins. ( i baked mine at 200C for 40 mins)
 
 
http://herfrozenwings.blogspot.sg/2011/03/green-tea-bread-loaf.html


Saturday, 26 January 2013

Ham and Cheese Stromboli ( JO Pizza Dough)


Jamie Oliver's Pizza Dough Recipe ( from here )
makes 4 portions, each portion about 6.6oz after proof
500gms bread flour /00 flour ( i used 00 flour)
1.5 tbsp sea salt
7gm of instant yeast ( i used 10gm)
1/2 tbsp caster sugar
2tbsps extra virgin olive oil
325ml lukewarm water

1.In a jug, mix the olive oil, sugar and yeast into water and leave for a few minutes.
2.In a large mixing bowl, combine the flour and salt using a fork to stir to mix, then attach the dough hook and let it run on low speed. Slowly pour in the yeast mixture till the everything comes to a rough dough and continue beating till the dough is smooth. I let them beat on medium speed for about 8 minutes.
3.Remove the dough and transfer it to a lightly floured surface, shape them into a ball and let it proof in a big bowl till double its size. After proofing, you can use the dough immediately or store them in fridge or freezer ( in clingwrap) until required.
 

Ham and Cheese Stromboli ( idea from BHG magazine )
4 pieces of ham
5 pieces of sundried tomatoes ( cut into small pieces)
a small portion of red or green capsicum, chopped into pieces
some mozarella cheese, shredded
black pepper
egg wash

1.Preheat oven to 190C, lined your baking tray and sprinkle some cornmeal
2.Dust the working surface with some flour and rolling pin, roll out the dough into a rectangle shape, 9" X6.5"
Arrange ham slices on dough, leaving about 1/2 inch on border, sprinkle with some cheese, follow by sundried tomatoes and capsicum , sprinkle some black pepper and another layer of remaining cheese. Starting from the long side of the dough, roll them up into a log, pinch the ends to seal.
3.Place loaf, seam side down onto the baking tray, brush with egg. Using a sharp knife, cut slits on top for steam to escape, bake for about 25-30 minutes or until golden. Let stand for 10 minutes before cutting to serve.
 
 
http://herfrozenwings.blogspot.sg/search/label/Bread


Brazilian Quick Rolls*


Do not get the impression that these are just another kind of bread rolls, they are not. It has a special ingredient that is tapioca flour, just this flour alone and no other flour to make these bread rolls. When i first came across this recipe, i was very tempted to try. First of all, it is very easy and quick to make, if you get ready all the ingredients, it will just take you around half an hour to get a batch of these done. Secondly, you dont need to do any kneading, no arms exercise and can ignore your electric mixer for a moment. However, you will need a blender to do the job and the job i'm referring here is just blend in everything together, blitzzz..that's it, pour it into your mini muffin pan or cases and then put it into the oven. Simple, right?
i do not have a mini muffin pan and used this silicone cases instead
fill them till 3/4 full
puffed up !

As these are made from tapioca flour, it does not have a bread or bun texture. When i had my first bite, it was a little crispy and as i continued eating, i thought it resembles something like a mochi. That chewy texture of a mochi, i also like the flavour here, cheesy and a little salty. I had these together with a bowl of pumpkin soup( recipe will be shared later ),the rolls were nice, the soup was delicious and i'm happy. It was mentioned that these rolls are best to be eaten when it's warm and not recommended to reheat it. Not to worry, this is also a small recipe, makes around 15 small rolls.


Recipe ( from ourbestbites.com )

Ingredients
1 large egg
1/2 cup milk
1/4 cup canola oil
1 cup tapioca flour
1/2 tsp kosher salt
1/4 cup grated cheddar cheese ( i put in 2 slices of cheddar cheese )
1/4 cup of grated parmesan cheese

optional: you can sprinkle extra cheese on the top and any herbs you like to add.

Method:
1.Preheat oven to 400F/205C. Place egg, milk, oil, tapioca flour and salt in a blender and blend till smooth. Add in the cheeses and pulse 2 times.Immediately pour batter into your mini muffin pan (spray lightly with a nonstick spray or oil them first) , filling each about 3/4 full

2. Bake for 15-20 minutes until puffed up and golden. Remove from oven and cool for a few minutes before removing them from pan. Serve warm.
 
http://herfrozenwings.blogspot.sg/search/label/Bread


Wednesday, 23 January 2013

Chocolate Banana Bread *


Recipe source : Joy of Baking
 
Ingredient

  • 55gm toasted walnuts, coarsely chopped
  • 230gm plain flour
  • 30gm unsweetened cocoa powder
  • 150gm sugar
  • 1 tsp baking powder
  • 1/4 tsp baking soda
  • 1/4 tsp salt
  • 85 gm dark chocolate chips
  • 2 large eggs, lightly beaten
  • 115gm unsalted butter, melted and cooled
  • 454gm ripe bananas, mashed well
  • 1 tsp vanilla extract

Method
  • Sift flour, cocoa powder, sugar, baking powder, baking soda, and salt into a mixing bowl.
  • In a medium-sized bowl combine the mashed bananas, eggs, melted butter, and vanilla. With a rubber spatula or wooden spoon, lightly fold the wet ingredients (banana mixture) into the dry ingredients until just combined and batter is thick and chunky. Fold in the nuts and chocolate chips.
  • Spread batter into a lined 9" x 5" loaf pan and bake in preheated oven at 160 deg cel for 75mins or until bread has risen and a toothpick inserted in the center comes out clean. Place on a wire rack to cool and then remove the bread from the pan. Serve warm or at room temperature.

 http://pengskitchen.blogspot.sg/2011/05/chocolate-banana-bread.html


Panda Bread

panda-bread1.jpg
7.jpg 8.jpg 9.jpg
10.jpg 11.jpg 12.jpg

Panda Bread:
Ingredients: 600g loaf (206 x 108 x100h)
230g bread flour
70g cake flour
30g sugar
milk + 1 yolk = 210g (I used skim milk)
4.5g salt
18g unsalted butter (I used 20g)
4g yeast
8g green tea powder dissolved in 10g boiling hot water
8g cocoa powder dissolved in 8g boiling water

Method:
1. Heat up milk and yolk to temperature of 38C. (I beat the yolk lightly with milk and send it to the microwave on HIGH for 30 seconds).
2. Put everything in bread machine and set to dough cycle. Let it knead for 20 minutes. Stop the cycle and restart the dough cycle and let it knead for another 15 minutes.
3. Divide dough (about 560g) into 3 parts: 75g for the chocolate, 210g plain and the rest of the dough which is less than 280g for the green tea.
4. Add chocolate to the 75g dough and knead till the colour is even. Add green tea mixture to the 280g dough and knead till colour is even. (I did this step manually).
5. Prove all 3 pieces of doughs on separate greased plates covered loosely with oiled cling wrap for 30 – 40 minutes.
6. Punch air out of dough and prove for another 20 – 30 minutes.
7. Use 90g plain dough for the face and 2 pieces of 27g chocolate dough for the eyes. (Refer to photo guide in Step (7) in TARO’s site).
8. Fill the hollow of the eyes with 30g plain dough. (Refer to photo guide in Step (8) in TARO’s site).
9. Roll remaining plain dough over the patterned dough. (Refer to photo guide in Step (9) in TARO’s site).
10. Divide the remaining chocolate dough into 2 pieces (17.5g each) for the ears. (Refer to photo guide in Step (10) in TARO’s site).
11. Use 70g of the green tea dough to fill up the hollow between the ears. (Refer to photo guide in Step (11) in TARO’s site).
12. Wrap the rest of the green tea dough all around the patterned dough. (Refer to photo guide in Step (12) in TARO’s site)
13. Place dough into a well-greased loaf pan and cover it with a lid and prove for 50 – 60 minutes in an enclosed area eg. microwave oven.
14. Bake at 200? for 25 – 30 minutes.

Notes:
1. This is not an exact translation of TARO’s recipe because I used the bread machine to help me so the first few steps might be different from TARO’s.
2. For Step (12), I did not wrap the green tea dough all around the patterned dough. Compare my finished product to that of TARO’s, you can see the difference.
3. My first prove is 60 minutes, 2nd prove is 30 minutes and final prove is 60 minutes.
4. I bake at 185C for 25 – 30 minutes.
 
http://perfectpandas.com/2008/01/08/panda-bread/


Cinnamon Rolls

Image


Bread ingredients
235 ml warm milk (110 degrees F/45 degrees C)
2 eggs, room temperature
75 g butter, melted
200g wholewheat flour
400g unbleached bread flour
1 teaspoon salt
80g white sugar
10g yeast


Filling
180g brown sugar
2 1/2 teaspoons ground cinnamon
75g butter, softened
70g chopped lightly toasted walnuts


Directions:
  1. Place ingredients in the pan of the bread machine in the order recommended by the manufacturer. Select dough cycle; press Start.
  2. After the dough has doubled in size turn it out onto a lightly floured surface, cover and let rest for 10 minutes. In a small bowl, combine brown sugar, walnuts, cinnamon and butter into a paste.
  3. Roll dough into a 16×21 inch rectangle. Sprinkle evenly with sugar/cinnamon mixture. Roll up dough and cut into 12 rolls. Place rolls in a lightly greased 9×13 inch baking pan. Cover and let rise until nearly doubled, about 60 minutes. Meanwhile, preheat oven to 400 degrees F (200 degrees C). Bake for 20 minutes or till top is golden brown. Enjoy!
Notes: Bread best eaten on day it is baked. But this is quite a big portion and if you have extras you wish to have for breakfast the next day, place the cinnamon rolls in the microwave for 10 seconds to warm it up so that it’ll be hot and fluffy again!


http://thelazychef.wordpress.com/2012/07/21/cinnamon-rolls-just-like-cinnabon-18/


Saturday, 12 January 2013

Sambal Sandwiches


Photobucket

Sandwich Recipe
Ingredients:
4 slices of White Bread, cut away the side.
Dried Shrimp Sambal
Butter for spreading
Cucumber, sliced
Tomato, sliced

Methods:
1. Spread both side of the bread with some butter.
2. Arrange cucumber on the base, spread sambal on top.
3. Top up with tomato slices and finally another slice of bread.
4. Cut sandwich diagonally & serve with hot coffee or tea.


Photobucket

Dried Shrimp Sambal Recipe

Ingredients:

10 nos Dried chillies (cili kering), washed & soaked
1 medium sized Onion, chopped
1 medium sized Onion, sliced thinly
1 nos Lemon grass - about 5 cm long, sliced
2 cm long Belacan, rinsed
30gm Dried Shrimp (udang kering), washed & soaked
100ml Tamarind juice (squeeze & soak)
6 tbsp Oil

Methods:

1. Soak 1 tbsp of tamarind paste with water. Squeeze the paste a little to brings out the flavour. Set aside.
2. Soak dried chillis. Set aside.
3. Combine dried chillies, lemon grass & belacan in a blender. Add in 2 tbsp of water. Blend until paste is formed.
4. Do not over blend the ingredients, it should be just nice or semi-paste.
5. Add in dried shrimp, blend for 2 rounds. Set aside.
6. Heat oil, sautee sliced onions until fragrant.
7. Add in blended paste, sautee slowly (stir & mix occasionally) till paste becomes fragrant & thick.
8. Add in tamarind juice bit by bit, keep on stirring & mixing till paste becomes thick again.
9. Dish up. Serve with rice, hard boiled eggs or even SANDWICH! Enjoy!


http://bits-of-taste.blogspot.sg/2008/11/asian-tea-time-with-authentic-sambal.html


Tuesday, 8 January 2013

Mushroom Bruschetta


Ingredients:

3 tbsp of olive oil
250 gm fresh button mushrooms, quartered
4 cloves garlic, chopped
1 tbsp chopped Italian parsley
Salt and freshly-ground pepper
to taste
Thick slices of baguette ( toasted with olive oil and parsley)

Preparation:

Heat the olive oil in a frying pan over high heat. sauteed the garlic and cook until aromatic, add the mushrooms until they start to color .
 
Add parsley and seasoning to taste.
 
Remove when the mushrooms are lightly browned, Served on toasted baguette.

Tip: Get the cooking done quickly before the mushrooms start to release water and lose their plumpness.